pour Blender 2.28
(et Blender 2.23/2.25/2.26/2.27 voir page des anciennes versions)
Jean-Michel Soler, fevrier2002/mars 2003 
Lumières vol+radio:Page précédente
Page suivante: Global settings
Options d'UVmapping.
Uvmapping options.
Subsurfs deformations 
UVmapping of multiple images 
Display
Solution: material index 
Solution: TextFace
Mixing of luminous effects linked to materials
Path of uvmapped textures
Known problems .
Exporter les textures et matériaux contenants des coordonnées uvmappées pose quelques problèmes.

Déformation des subsurfs 
Il est relativement simple d'exporter l'uvmapping lorsqu'il n'y a qu'une seule image. Dans ce cas le seul problème que l'on peut rencontrer est une légère déformation dû aux subsurfs.

Exporting textures and materials containing UV coordinates is a bit difficult ....
 

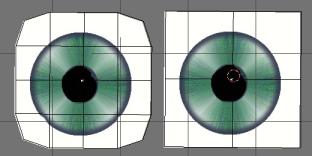
Deformation of the subsurfs
It is relatively easy to export UVmapping when there is only one picture.In this case the only problem we can meet is a slight deformation due to subsurfs.

Cependant la déformation est minime si on n'utilise que des faces quadri-angulaires.Pour les facettes triangulaires, les modifications sont plus importantes et dépendent beaucoup de l'orientation et de la combinaison des faces originales. However the distortion is insignificant if we use only quadriangular faces.With triangular faces, the distortion is greater and depend on the orientation and combination of original faces.....
UVmapping d'images multiples

L'outil "Faceselect" de Blender permet d'attribuer plus d'une texture uvmappée à un mesh. En fait, chaque facette pourrait recevoir une texture différente. 

UVmapping of multiple pictures

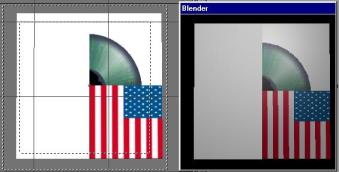
The Blender tool "Faceselect"  allows you to attribute more than one UVmapped texture to a mesh. In fact, each face could receive it's own texture. ...

Affichage
La visualisation en faisant le rendu à partir de Blender n'est, hélas, pas aussi simple que l'attribution. Si on essaye simplement d'utiliser les images à partir de deux textures de type Image dans le même Matériau, le résultat ne correspond pas du tout à ce qui est attendu.

Seeing the result of multi-uvmapping in Blender  is more complicated than attributing the textures themselves.
If we merely try to attribute the pictures by using two textures of the type "Image" in the material of the mesh, the result is not the expected one.
Solution: indice de matériau
Une des solutions consiste à passer par le tableau d'indices de matériau qui se trouve dans la fenêtre d'édition des meshes. On attribue alors un matériau contenant la texture Image adéquate à chaque face ou groupe de face. On ne peut pas dépasser 16 matériaux. Mais ce n'est une limite que dans le tableau d'indice de Blender qui reste très pratique si on cherhce à identifier rapidement les faces sur lesquelles sont collées telle ou telle images. 

Solution: TextFace
Si on n'a pas besoin d'autant de précision et d'ordre dans son travail, il est toujours possible d'utiliser le bouton TextFace de la fenêtre de matériaux pour afficher absolument toutes  les images uvmappées dans un rendu rapide. 

Solution: material index
One of the solutions is to go through the indexes table of material, which is in the edition window of meshes; we then assign a material containing the appropriated image texture to each face or group of faces.

We can go over 16 materials. But it is a restriction only in the Blender indexes table which stay very useful if you want to quickly identify the faces on which such or such images are sticked.

Solution: TextFace
If you don’t need such a precision and tidiness in your work, you can still use the button TextFace in the materials window to display absolutely all the uvmapped images in a quick render.. 

Chemin des textures uvmappées
Pour l'uvmapping, Povanim n'utilise pas les  informations du tableau d'indice mais le nom de l'image attaché à chaque facette .  En respectant quelques règles de stockage des images, il doit être possible d'exporter toutes les coordonnées uvmappées pour toutes les faces. 

Le script associera  toujours un sous-répertoire "textures" au répertoire dans lequel se trouve le fichier exporté.

Mixage des effets liés aux matériaux
Les variations des matériaux référencés dans le tableau d'indices restent attachées à chaque face, quelle que soit l'image UVmappée. 

Pigment_map ou Texture_map?
La puissance du pigment ou de la texture uvmappée peut être modifiée dans le mélange en jouant sur leur valeur dans la "carte" (mapping) de pigments ou de textures. Les notions de  pigment_map et de texture_map devront être approfondies en lisant la documentation officielle de povray (ou, si on est un francophone,  la doc française officielle). Dans povanim, il est possible d'exporter les fichiers en choisissant l'une ou l'autre. Pour cela il faut utiliser le panneau des textures  qui se trouve sur la fenêtre principale de l'interface graphique:

Mélange des pigment et de la texture UVmappée
Par défaut tous les objets exportés sont gris clair. La texture uvmappée est plaquée et mélangée à cette couleur à 50%. On peut donc trouver que le résultat est trop blanc. Surtout si les effets spéculaires sont importants. Pour contourner cette situation il y a trois voies. 

La première consiste à ne plaquer que la texture et oublier la couleur. Pour cela, il y a des explication sur la page finish , on utilise le paramètre Only Shadow. Cette méthode est d'autant plus pratique qu'elle ne s'applique qu'à un matériau exclusivment. Donc des partie de l'objet peuvent être mélangés et d'autres pas. 

Cependant on peut souhaiter ne pas modifier l'apparence de l'objet à l'affichage dans Blender. Pour cela, on peut utiliser la seconde solution : les Globals Settings, qui se trouvent sur la fenêtre Material de l'interface graphique de Povanim. Voir ci-dessous:

Path of the uvmapped textures
For uvmapping, Povanim doesn’t use the data recorded in the indices table but the picture name attached to each face. With consideration for a few simple rules concerning the storage of the pictures it must be possible to export all the uvmapped coordinates for all the faces .

The script will always connect an under-directory called "textures" to the directory in which the file is exported.

Mixing the effects tied to materials
The variations of the materials classified in the indices table stay attached to each face, what the uvmapped picture may be.

 Pigment_map or Texture_map ?
The depth of pigment or uvmapped texture can be modified in the mixture by playing on their value in the "card" of pigments (mapping) or textures. The notions of pigment_map and texture_map must be increase by reading the official documentation of povray (or, if your are a French-speaking the official French doc ). In povanim, you can export files by choosing one or the other. To do this you have to use the textures pannel which is in the main window of the GUI.
 

Mixing the pigment with the Uvmapped texture

By default all the exported objects are of light grey. The uvmapped texture is put and blended to this colour up to 50%. You may find the result too white to your tastes. Especially if specular effects are pushed high. To pass round this situation there is three way.

The first one is to put only a texture and to forget the colour. For this, You can find explanation on the finish page, we use the Only Shadow option. This method is all the more practical as it applies to a lone material. Thus parts of the object can me mixed and other not.
 

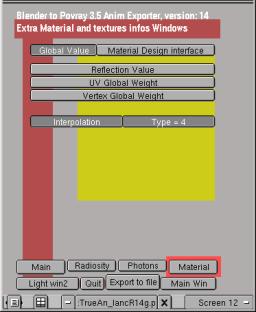
However you may wish avoiding any modification of the object appearance when rendered under Blender. To do so, you can use the second solution: the Global Settings, which is located in the Material window of the Povanim GUI. See below: 

On y trouvera deux boutons : UV Global Weight et Vertex Global Weight qui activent deux curseurs grâce auxquels ont peut modifier le poids de la texture uvmappée et du vertex color dans le mélange. En donnant une valeur 0.0 à Vertex Global Weight,  il disparaît complètement laissant la place à l'image UVmappée. You will find two buttons : UV Global Weight and Vertex Global Weight which activate two wipers that you can use to change the weight of the uvmapped texture and vertex colour in the mixture. By giving a 0.0 value to the Vertex Global Weight, it disappears completely leaving the place to the Uvmapped picture.
Le problème de cette méthode est son application générale. Aucun objet n'y échappe. Il reste encore une troisième possibilité: La modification du fichier mat_monfichier.inc.
En effet, on trouvera à la fin de ce fichier une série de déclarations du type:
The problem of this method is to put it into practice globally.  None of the objects escape from this. There is a thrird solution left: modifying the file mat_monfichier.inc.
Indeed, at the end of the file you will find some definition of that kind :
//List of colors and uvmapped image power 
//this works by object, select the one you want to change
//you can also use the global material setting in the export script

#declare PSphere_012_img=8.763;
#declare PSphere_012_col=0.0;
#declare PSphere_009_img=8.763;
#declare PSphere_009_col=0.0;
 

C'est tout simplement la liste des noms d'objets uvmappés précédés d'un "P" pour pigment et suivi d'un suffixe qui indique sur quel partie du mélange couleur/image agira le coefficient.
 

sComment être sûr de l'emplacement de ses textures?

La meilleure manière consiste à les compacter :

It is simply the list of the uvmapped objects names preceded by a "P" for pigment and followed by a suffix that indicates on which part of the mixture colour/picture will act the coefficient.
 

How to know precisely the location of the textures?

The better manner is to pack them :


et à les décompacter ensuite: And unpack them after:
Pour l'instant le meilleur choix est celui qui commence par :
//textures/
et ce quel que soit les indications données à gauche du tableau ou à droite entre parenthèse...
For the moment the better choice is the one that begins with:
//textures/
and this whatever the indications given on the left of the table or on the right in brackets may be…
... et ce quel que soit les indications données à gauche du tableau ou à droite entre parenthèse. And whatever the indications given on the left of the table or on the right between brackets may be…
Cette opération garantie la présence des images dans un répertoire déclaré dans les librairies de povray. This  operation secure the presence of the pictures in a declared directory known by the povray library.

Known problems

None....

Tous les droits réservés pour le logo "povanim", les explications, scripts et images sur cette page par JM Soler 2002-2004
Pour toutes les questions touchant les éventuels problèmes rencontrés avec cette page contacter l'auteur sur le forum de discussion:
3D.Blender
Lumières vol+radio:Page précédente
Page suivante: Global settings
Index principal