|
Pour Blender 2.23->2.27
 
Pour Blender 2.28-> et suivants.
| Compatibility
with megapov and access to post processing |


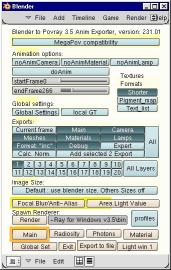
| By
pushing the button MegaPov0.7 compatibility Povanim offers you the
ability to export data in accordance with the Megapov file format, that
is to say that the file begins with the line: |
| #version unofficial MegaPov 0.7; |
|
Once
the compatibility choice is made you see a second button that enables you
the access to post processing.
These effects are not
available in the standard version of Povray and will be studied in a particular
page. There are three of them: Find Edges, Posterize and Focal Blur |
| Recent evolution:
Megapov 1.0 et MlPov 0.8 |

|
| Mlpov0.8 permet de
calculer des éclairages avec effets de radiosité en utilisant
des images HDRI. |
 |
| Megapov 1.0 offre une
gestion des effets dynamiques et mechaniques de certains objets . |

|
| Animation
(problèmes
avec blender 2.25 et 2.26 ** ) |

| noAnimCamera
, désactive
l'export de l'animation de la caméra. Donc si la caméra est
immobile autant choisir cette option qui devrait évite rla production
d'un certain nombre de fichiers.
noAnimMateriel,
même fonction pour les matériaux
noAnimLamp, même
fonction pour les lampes
doAnim,
Active l'exportation de l'animation.
startFrame, indique
à partir de quelle image l'animation doit être exportée.
Si la valeur est ZERO alors ce sont les paramètres de Blender qui
sont pris à la place.
SendFrame, indique
l'image de fin d'animation. Cette valeur n'est pas prise en comte si startFrame
affiche 0. |
| ATTENTION
!
L'exportation
des objets déformés par armature dans Blender 2.25 et 2.26
demande une précaution supplémentaire. En effet, il est nécessaire
de garder au moins une fenêtre 3d ouverte pour que les modifications
de l'animation soient prises en compte. |
Globals
Settings |

| A
whole page is dedicated to global settings, click on the picture
here above.
Textures formats. |

-
Shorter or Longer
you have to choose, this option allows you to reduce considerably the number
of exported textures for a given object. Each face of a mesh has its own
texture, in some cases where the definition of the shape is very precise
you can have tens of thousands units. You easily understand that this can
congest the memory. The sorting process is pretty long but this choice
doesnt change anything to the appearance; the script only gathers the
textures that have exactly the same definition.
-
Longer, see Shorter.
|
Exemple "Shorter"
1,texture{
pigment{average pigment_map{ [PSphere2_col color rgb<0.8,0.8,0.8>*0.8]
[PSphere2_img Sphere2_img]}}finish{Material_fsh}} |
Exemple "Longer"
5952,
texture{pigment{average pigment_map{ [PSphere2_col color rgb<0.8,0.8,0.8>*0.8][PSphere2_img
Sphere2_img]}}finish{Material_fsh}}
texture{pigment{average pigment_map{ [PSphere2_col color rgb<0.8,0.8,0.8>*0.8][PSphere2_img
Sphere2_img]}}finish{Material_fsh}}
texture{pigment{average pigment_map{ [PSphere2_col color rgb<0.8,0.8,0.8>*0.8][PSphere2_img
Sphere2_img]}}finish{Material_fsh}}
texture{pigment{average pigment_map{ [PSphere2_col color rgb<0.8,0.8,0.8>*0.8][PSphere2_img
Sphere2_img]}}finish{Material_fsh}}
texture{pigment{average pigment_map{ [PSphere2_col color rgb<0.8,0.8,0.8>*0.8][PSphere2_img
Sphere2_img]}}finish{Material_fsh}}
texture{pigment{average pigment_map{ [PSphere2_col color rgb<0.8,0.8,0.8>*0.8][PSphere2_img
Sphere2_img]}}finish{Material_fsh}}
texture{pigment{average pigment_map{ [PSphere2_col color rgb<0.8,0.8,0.8>*0.8][PSphere2_img
Sphere2_img]}}finish{Material_fsh}}
texture{pigment{average pigment_map{ [PSphere2_col color rgb<0.8,0.8,0.8>*0.8][PSphere2_img
Sphere2_img]}}finish{Material_fsh}}
texture{pigment{average pigment_map{ [PSphere2_col color rgb<0.8,0.8,0.8>*0.8][PSphere2_img
Sphere2_img]}}finish{Material_fsh}}
texture{pigment{average pigment_map{ [PSphere2_col color rgb<0.8,0.8,0.8>*0.8][PSphere2_img
Sphere2_img]}}finish{Material_fsh}}
... //5952 fois le même |
|
-
Pigment_map or texture_map
to be chosen, this option allows defining the format in which the blending
of the different components of the colour will be made, seeing the example
here above.
|
Exemple "Texture_map"
1,
texture{
average
texture_map{
[PSphere2_col pigment{color rgb<0.8,0.8,0.8>*0.8} finish{Material_fsh}]
[PSphere2_img pigment{Sphere2_img} finish{Material_fsh}]
}}
|
|
-
Texture_map or pigment_map to
be chosen. Click the button to enter the setting. A definition of
that kind looks like the example here above. This type of format is not
very interesting concerning rapidity of rendering but can be useful in
particular cases.
-
Text_list should save more storage
capability, but this option is not available yet.
Dividing files in parts |

To
meet the animation format of Blender it was necessary to divide the Povray
files in several parts. This structure offers a good advantage; it allows
you to export just one part of the data instead of having to export the
whole each time.
-
Currents frame, send you
back to the current frame at the end of the exportation. The other way
should be to stay in the last processed frame.
-
Main is the main file,
in which are defined the global settings and the layers of lights. If you
want to adjust some radiosity effects, it is no longer necessary to export
the whole current file, although for animation.
-
Camera, Meshes, Materials
and Lamps files work like Main file without any additional advantage.
A next version will probably allow exporting only data separated from a
selected object.
-
Format: "Inc", could
allow exporting data in the raw text format with a macro to gather them
in the Mesh files. It became hard to keep this option in the recent evolution
of the script. It will be back again some day...question of time and will.
-
Debug allows activating
or deactivating the display of certain data in the console window.
-
Expert activate/deactivate
the tests made on the extension of files and the presence or not of certain
necessary objects. These tests stop the exportation, block it abruptly
; such a thing may be annoying for expert users who of course need the
basic structure of exportation but can add and modify what is necessary
in order that they wont be surprised by the povray messages.
Recompiling the normals |

| A
whole page is dedicated to the recompiling of the normals click
on the picture here above.
The layers |
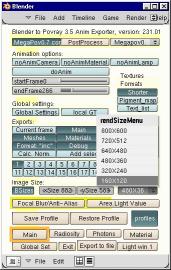
Tailles
de l'image (> Blender 2.25) |

| The
python API of the blenders versions equal to or older than the 2.25 dont
allow to identify the size of the picture displayed at render. It is necessary
to give this information through the dedicated buttons. As it is easier
to choose options in a menu, a selection of standard sizes is offered. |

Launching
an external renderer
The button Render calls
povray
3.5, megapov0.7, mlpov 0.8 or megapov1.0 depending
on the selection of compatibility youve made. The right button indicates
the path to reach the executive file. |

| The name of the software as
well as the path is legibly visible in the script. |
megapov10Path="G:\\stock_logiciel_et_plugin\\3d\\povray\\megapov\\bin\\"
mlpov08Path="G:\\stock_logiciel_et_plugin\\3d\\povray\\mlpov\\bin\\"
povray35Path="F:\\Program Files\\POV-Ray for Windows v3.5\\bin\\"
megapov07Path="F:\\Program Files\\POV-Ray for Windows v3.1\\bin\\"
megapov10Name="megapov.exe"
megapov07Name="megapov.exe"
mlpov08Name="mlpov.exe"
povray35Name="pvengine.exe" |
|
| Footer |

|
